
Previously, I have used Mockaroo and Flow to generate data, but the data I required for demoing the Customer Services Insights functionality has to be linked from existing data to be valid.
In this post, I will guide you through the methods I have used to randomise and create demonstration data that fits the requirements for Customer Service Insights, just using Power Automate and an Excel file.
TL;DR
Customer Service Insights only really works with data. This is great if you have some, but most demonstrations or trials have 10s of cases rather than 1000s. Here I walk through generating data using Flow, Rand() and Excel, mainly. Also, how to correct data if you didn’t quite get it the right first time 😊.
Creating Cases
Cases in D365 are linked to Contacts and Accounts and they need a title. As a bare minimum, this will create a case. But, for Customer Service Insights to work effectively, you need a few more parts.
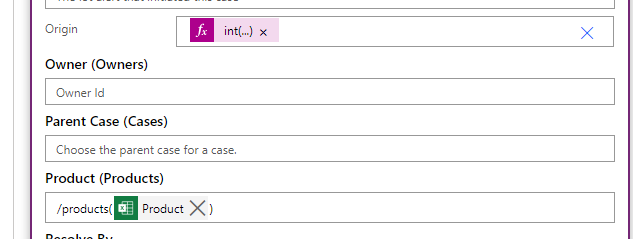
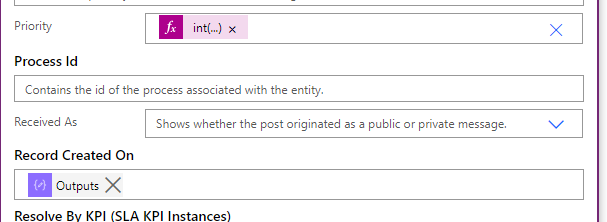
Origin is where the case came from, typically Twitter, Facebook, Phone, Email, Web etc. This allows for the segmentation of your customer base by source. Products link the case back to the faulty product or service that the case was about. A Priority is also needed to define the workload case for your staff or denote a superior service. Also, we need to know the satisfaction or the originator of the case with the resolution. This can be taken from a Forms Pro survey, for example.
All these fields I have taken from the various parts of the Customer Service Insights reports and wanted to generate data with this populated to allow for an impressive and realistic visualisation in CSI.
But I wanted to randomise the data, it is quite easy in Flow to create records, but to randomise them you need to choose from a selection, you could query the data in your system for each of these, but I found it easier to use a central store of the lookup data.
Excel for Random Data

In Excel, I created an OneDrive file and added a table. In this table, I added several columns with information to build up a case.
Topic Start - Combine 3 fields to make the title of the case, which allows for randomising the title but keeping some keywords to allow for Topic categorisation by CSI.
IdCol - this is the key for the table. Each valid row has a unique number so I can retrieve the row in Flow later.
Topic Main - This is the middle part of the Title field. I am actually using a list of drug names I found on generatedata.com. By using a list, I hope to be able to drive the Topic categorisation.
Topic End - The final part of the topic, just some random words I thought sounded like ends of case titles.
Contact - This is the GUID for all the active contacts in the system. I exported the list to excel, unhide the columns on the left and grabbed that list.
Channel - These are the numeric values for the optionset used for Channel. I drilled into the options set from the field on the case.
Priority - Again a numeric values for the Priority optionset.
Product - This is a list of the active Product Ids in the environment.
Create Cases Flow
The overall flow is quite lengthy and has several conditions. Let’s step through it from the top. The flow is available in my CustServInsights solution here.
First of all, trigger the flow from a button. The input parameter denotes how many cases you would like to make. Ensure you keep this as 1 for testing. Also, initialise the case counter for use in the next loop.
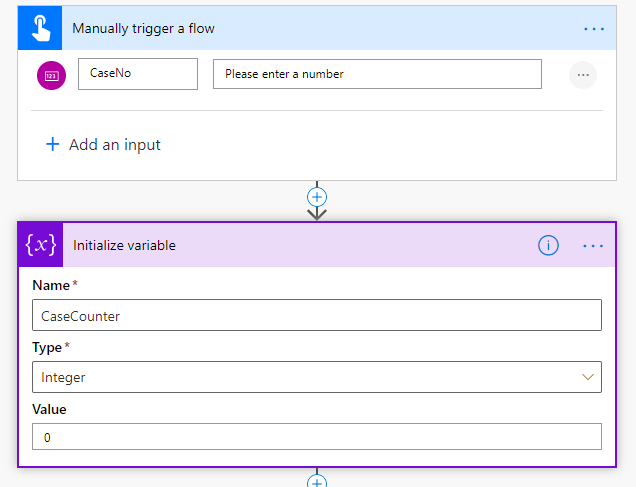
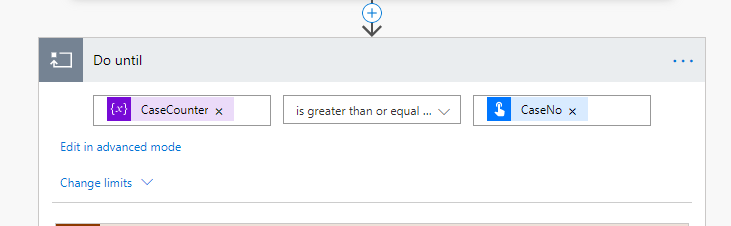
Next, create a Do Until loop. This will keep looping until our case counter matches or exceeds the required number of cases.
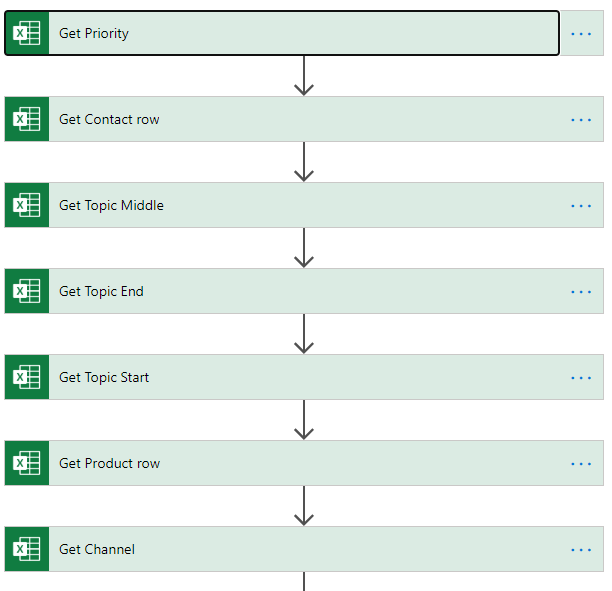
Retrieve the random data
Next, get the relevant lines from that Excel file. For each of the fields, choose a random number from 1 and the maximum number for each data set and get the corresponding row in the Excel file. This is for Priority where I have 5 rows in the Excel sheet (I duplicate Normal which has a value 2 to weight the priorities in favour of Normal), hence the Rand function is
Rand(1_
Rand (1,6) for Priority.
The Key Column is the IdCol of the file, populated with integers

This action is repeated for each of the random columns in the Excel file.
Create a case
Next, use these values to create a Case. Use the Create a new record action and populate with the appropriate values. Title uses a combination of each of the topic parts. Customer (Contacts) uses the confusing for citizen developers syntax to populate the contact on the case. This only applies if you are using the Current Environment version of the custom connector. There is an idea to revert this back to the previous syntax here. Please vote! I also added a description, just so I can retrieve these new cases later if I need to.
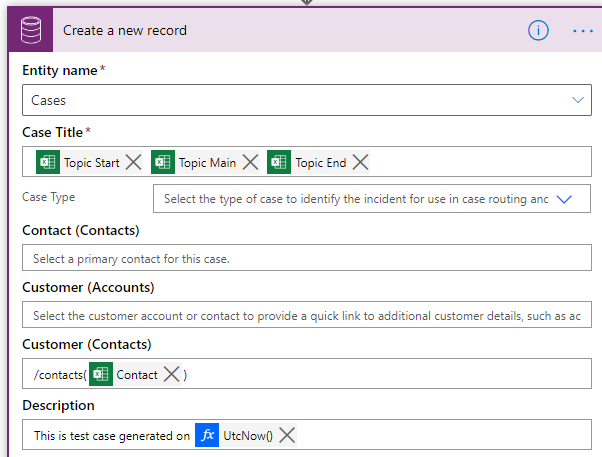
Origin uses the number for the optionset returned by the Excel and converts to an integer. The product field uses the same syntax as Contact.
Priority is converted to an integer as well. Record created on is used to alter the created date of the record. It is a pseudo change, as the record keeps both what you want to show and the actual date as separate fields in the CDS. Unfortunately, there is a bug in both CDS connectors and the D365 connector that strips out the time part of the field. I raised the bug here.
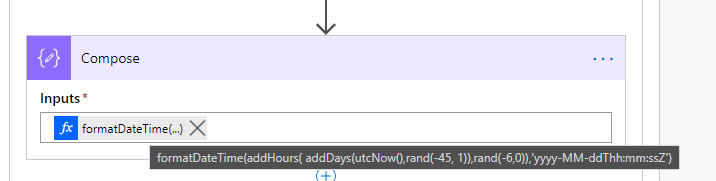
The compose used as a parameter is below. Use the rand function again to subtract up to 45 days from the current date and subtract up to 6 hours from the result. Finally, format the result to a date-time acceptable by the connector
Complete the SLAs
Once the record is created, randomise the closure as well as whether it met any SLAs in place for first-contact and closure. Firstly, generate another random number which will be used to define which path our case will take. Next, choose if this case is still open. Any value greater or equal to 8, so 8, 9 and 10 or 30% of the cases, should be still open.
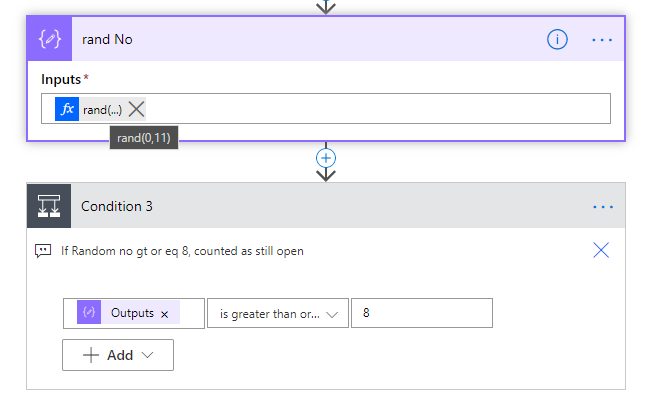
On the positive side, the case is still open, another condition to decide if the case was responded to in time. This effectively means 10% of the cases will have failed their First response SLA and are still open. 20% will be still open but the first response was passed. The positive side of this condition is empty, the negative side, update the SLAs to show the first response SLA is met.
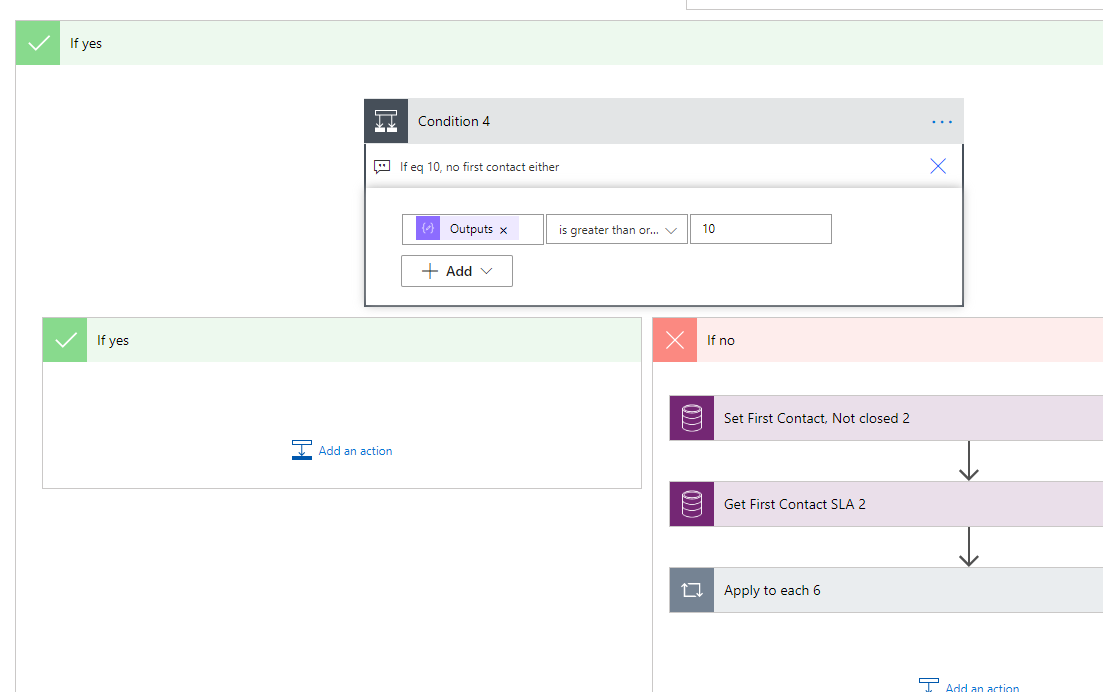
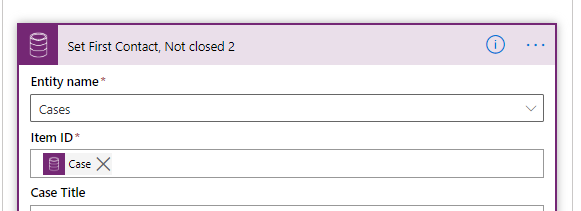
The first action in the negative side is a Update Record, using the Id of the created record. Update the first response field to Yes and the SLA succeeded to Yes. This is normally populated via workflow in the application.
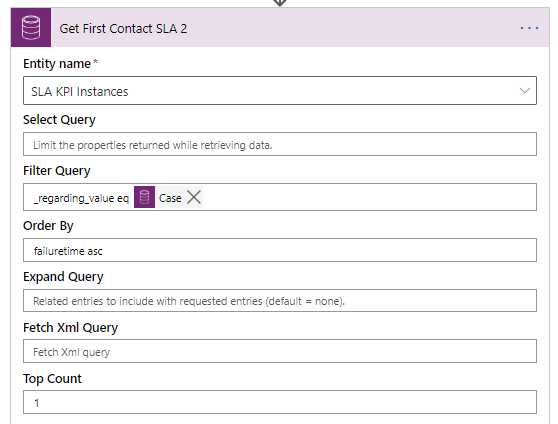
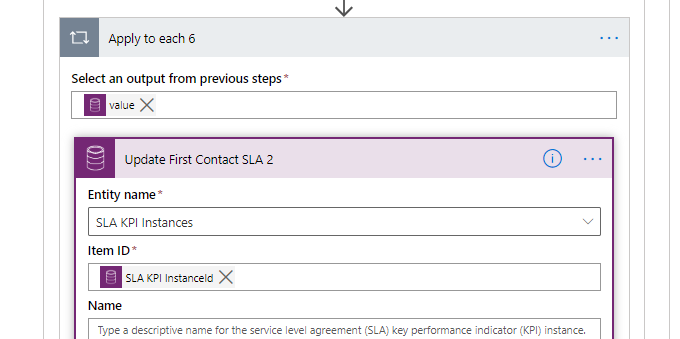
The next step is to retrieve all the SLA instances associated with the record. These are created when a case is created (if you have a default SLA configured) and denote when the SLA for that case will be breached. To make these appear as if the case passed its first response SLA, update the first response instance for this case. Firstly, find the record. This is a list records action, against the SLA KPI Instances entity, with a filter to retrieve only those that are for the case created. The order by condition means that the first response instance is returned first, as it’s failure time is naturally before the closure SLA failure time. Using the top count of 1 restricts the return to only one record. This should hopefully mean we retrieve 1 record only and that is the first response SLA.
Loop through (there will only ever be one) the results and call an Update Record for each, marking the status as succeeded and populate the succeeded on date. Using the warning time will ensure it is prior to the failure time.

Closing the Case
On the negative side of the first condition statement, case is going to be closed, but first randomise whether this case met it’s case SLA. If the random number is 1 (10 % of cases) the case will be closed, but both the first response and case closure SLAs were not met.
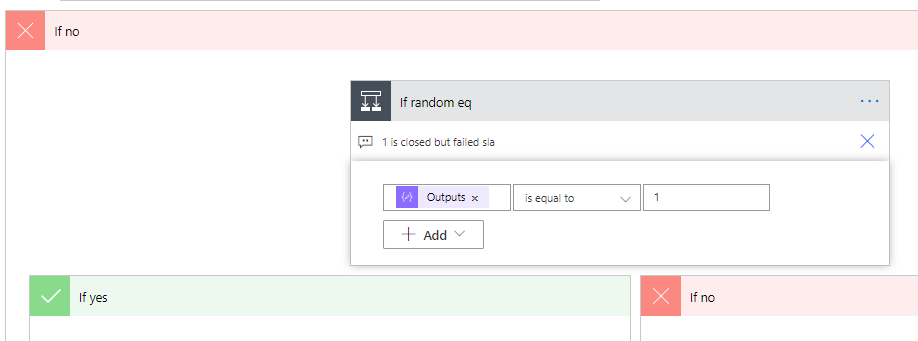
In the Yes part, use the same technique to the get the case SLA instances and update all of them to Non compliant.

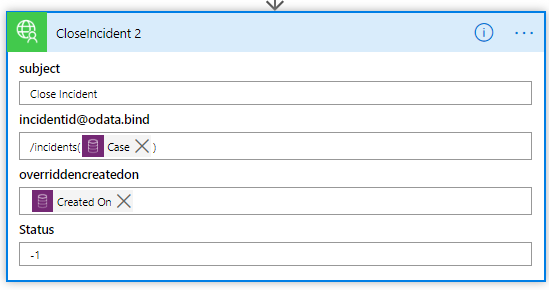
On the No side, make them all Succeeded and populate the date with the warning date, same as previous. The final part is to close the case. Whilst you now have the ability to perform an unbound action, I could not get it to work. Instead, I used a custom connector.
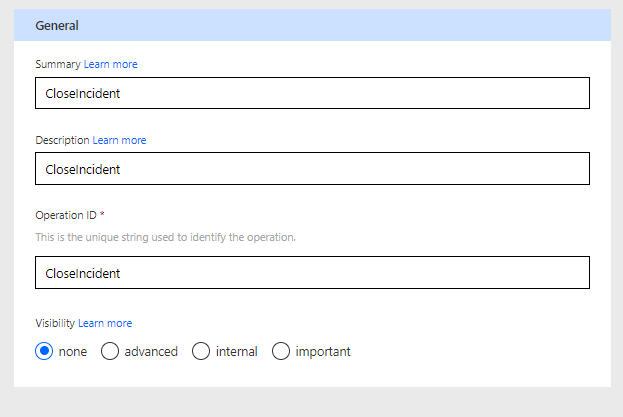
Custom Connector to close Incident
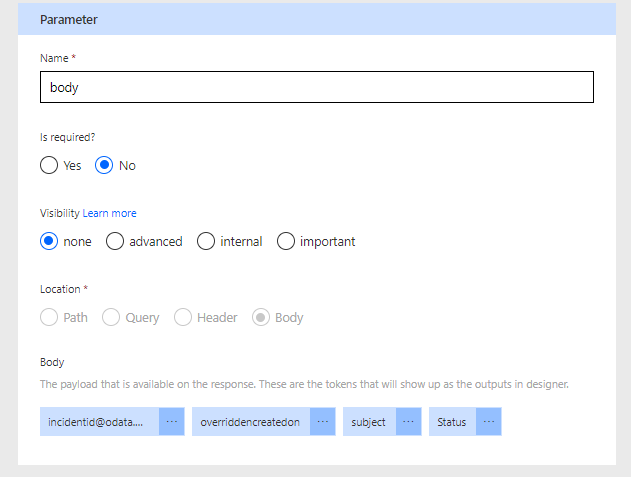
I have numerous posts about configuring custom connectors, start with this article on LUIS to create one. The action is CloseIncident and defined like this.
The body of the request is below.
| |
This is a post action against the CloseIncident action, the request is defined below.
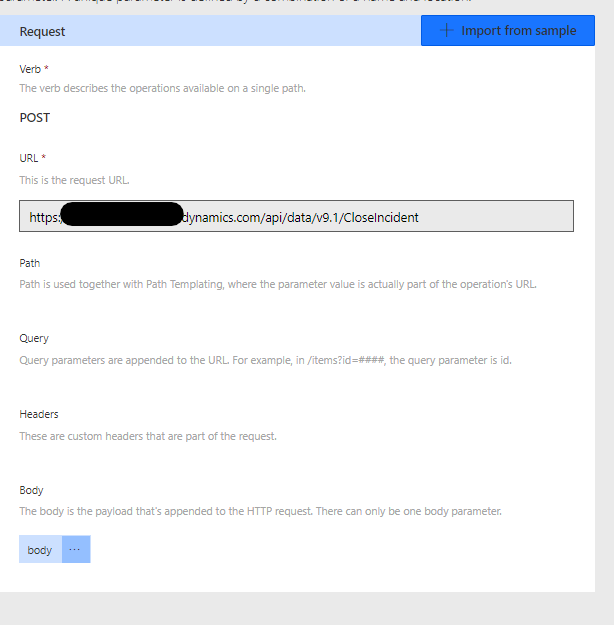
Drilling into the body parameter, you can see each of the parameters that are required.
Using this in Flow is straight forward, add a new custom connector and populate the parameters. Be careful over the case Id, as it needs the odata binding populated.
Finishing the loop
The final part we do is increment the counter variable to ensure only the number of cases we specified are created.

In terms of creating cases, that is it. I created nearly a thousand cases this way in 30 minutes (took a few hours to build out the code obviously) but this is reuseable and even 1000 records in 3 hours is not achievable by hand.
Updating cases Flow
There is always a time when you forget something. In this scenario, Customer Services uses the CSAT score and whether the case is escalated, and my original flow didn’t include that information. In hindsight, add these values to the Create case flow. To correct, I created another flow.
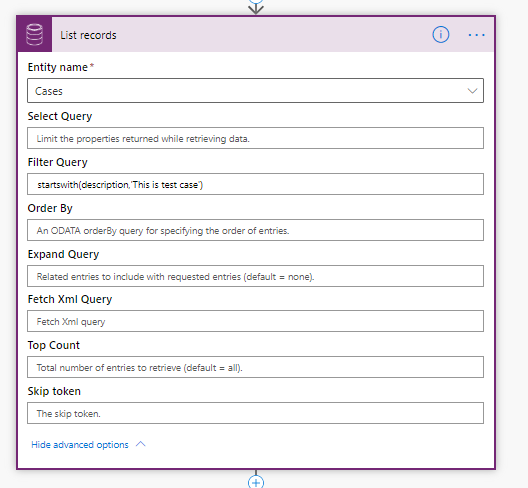
The trigger is the same, manual flow button. The first step is to retreive all the cases that I created. Remember I added to the description “This is a test case generated on UtcNow()”? This allows me to retrieve all the cases with a description that starts the same.
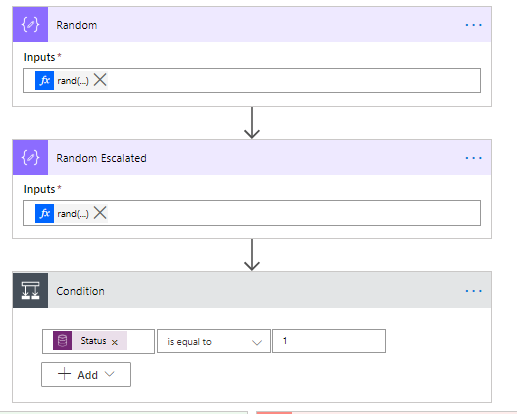
Then I loop through the retrieved cases. First of all, create 2 random numbers for use later. Then check if case is closed.
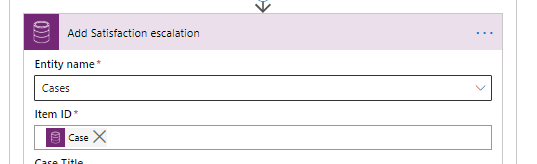
If a case is closed, all you can do is update the status and a few other fields, not all of them. If you try to update the Satisfaction on a closed case, you will get an error. So, for closed cases, open it first, by updating the record status and status reason.


Then, update the record for a second time, this time adding the Satisfaction and Is Escalated flag. Satisfaction uses a formula to state if the random number, 1-6 is 5 or 6, use 5 as the rating, otherwise use the value of the random number. This allows for a weighting of the satisfaction emphasising a higher rating.

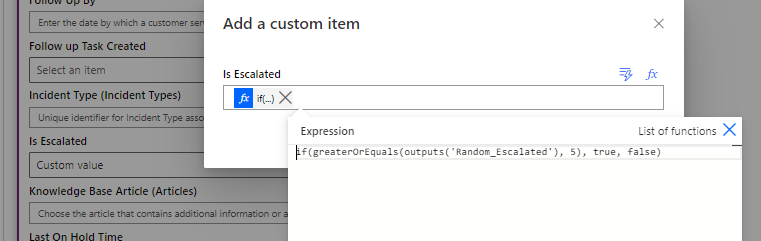
Is escalated is true or false. In this scenario, I use a random again, so if the number is 5 or 6 using a range of 1-6, the case was escalated. This means only a small proportion is escalated.
Now the case has the data required, close the case again with the custom connector used earlier.
For the open case, side, just update the record, no need to open first.
Header Photo by Alexander Sinn on Unsplash